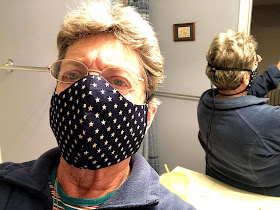
Of course I agreed. Here is my first effort:
I printed all the different sizes on regular paper and then again on cardstock to cut out (for tracing).
I had a lot of fun finding fabric in my stash with children's motives and fuzzy cutting. This size is for 3 to 6 year olds. Perfect.
I had a lot of fun finding fabric in my stash with children's motives and fuzzy cutting. This size is for 3 to 6 year olds. Perfect.
You cut the piece "Main Fabric" twice in opposite direction. (The stabilizing backing doesn't go all the way)
Also cut the piece "Lining Fabric" twice in opposite direction. You need 4 pieces of iron-on backing. I cut the backing a little larger on 3 sides but flash on the straight side so I can match it with the line on the "Main Fabric" pattern. After ironing-on I trace and cut it out.
I used this as the backing but the above link also has a PDF with suggestions of backings.
This is the "Man" version. It fits me better than the women version.
As you can see in the above photo I decided to change the pattern a little though. When I tried my first "prototype" on one of my grandsons, I noticed that tying behind the head might be a problem. I found a bag in my stuff which had just the thing but I wasn't sure what it was called. I took it off the bag and used it on the "prototype". My daughter was excited about it.
More research on the internet. With my husbands help we found the things called a cord locks which arrived soon. As with the elastic for the ear loops it was very difficult to find the right cord. Harbor Freight had very inexpensive 1/8 inch paracord but only in the second store I went to.
I am still experimenting but found that the mask is more comfortable with a piece of wire sewed in. The link has a video with lots of options what to use. I found that a twist tie cut to 4 1/4 inches with the ends bend over to "un-sharpen" is very good.
Next time I will sew it onto the stabilized lining before sewing the main fabric and lining together.
I find that this type mask interferes less with my glasses.
And a tip:
I made a mistake at one point and decided to correct it with a new tool I had bought at the Hampton Quilt Show earlier in the year. OMG, this ripper did an unbelievable job. In seconds it was done.
There is so much on the internet. What I found was very helpful to me. Hope I helped you a little too. Feel free to leave a comment. Even constructive criticisms is welcomed.
* * *
Amendment:
I forgot to mention this about the paracord:
You need to push back the outside so you can cut off a little of the inside.
* * *
Amendment:
I forgot to mention this about the paracord:
You need to push back the outside so you can cut off a little of the inside.
Pull the outside past the middle and hold the end for just a very brief moment into a flame. Then push it together. Otherwise the ends are fraying mercilessly.


No comments:
Post a Comment